Memorial Day may be the traditional start of summer, but anglers know it gets underway when aquatic vegetation is at its fullest. And while it’s exciting to watch bass blast their way through matted grass to engulf your topwater frog or toad, there are times when you have to go into the beds to get them.
Texas-rigged soft-plastic lures always are a good choice for this work. Their hidden hooks and bullet-shaped weight let them slither through the thickest aquatic vegetation, emergent or submerged. But they aren’t the only choice. Equipped with weed guards, bass jigs are at home in the same jungles and produce bigger bass, especially in northern natural lakes.
Best known for their prowess in cold water, bass jigs are powerful producers in warm water, too. They are bulky, imitating crawfish and panfish, both summertime bass favorites. They are easy to pitch and flip to pinpoint spots. And their sink rates are easily adjustable. Tie on a heavier one to ignite reaction strikes or crash through the vegetation. And add a big trailer to slow it down.
Jigs straight from the package catch their fair share of bass. But it’s easy to make new and used ones better. All you have to do is follow this five-point service.
Work on the weed guard
Summertime bass enjoy the most expansive and thickest aquatic vegetation of the year, eating and living within the beds until the cold weather of fall cuts them back. Reaching them requires sending your jig into the grass. Getting it back without snagging is the responsibility of its weed guard.
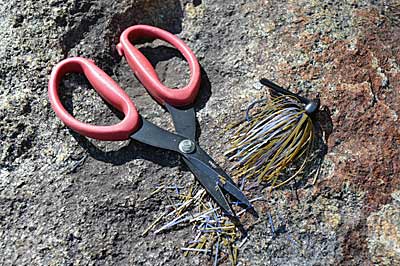
Bass jigs are equipped with one of several types of weed guards. There are the single or double wire or plastic ones, which are better suited to keeping your jig from snagging wood or rock. The best guard for fishing aquatic vegetation is made of bristles — bundles of nylon strands. They provide better coverage and require more effort to reveal the hook, which is helpful when your jig is constantly colliding with stems and leaves. But there are ways to make them better. And all you need is a pair of scissors or small cutting pliers.
While your first instinct may be to shorten the bristles, don’t do it. That makes them stiffer, keeping them from getting out of the way when you set the hook. Instead, thin the guard by cutting out a few strands closest to the line tie. That will preserve its protection and make it more pliable.
Increase the bristle guard’s effectiveness further by bending its strands into a fan shape. It doesn’t have to be wide, maybe twice the original width.
Check the skirt
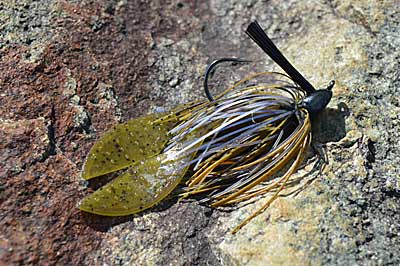
While every one of a jig’s components is essential, the skirt draws the most attention. Color, material, and length are all considerations. And each can be manipulated to make your jig better for the current conditions.
Skirts, whether OEM or garage built, need a trim. A good length is between 3/8 and 1/2 inch longer than the hook. The shorter its strands are trimmed, the more they puff out underwater. Leave them long, and you’ll create a streamlined look. Try trimming only the strands around the outside of the skirt, leaving the center ones longer. You can even trim short the ends closest to the head, creating a style popular on many finesse jigs.
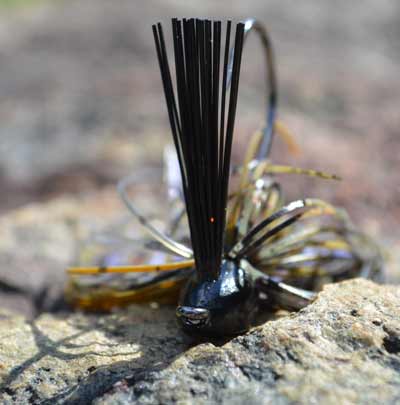
The little rubber collar holding skirt strands is asked a lot. Beef it up — or completely replace it — with large-size fly-tying wire. A couple of wraps and a few twists are needed to ensure it can repeatedly crash through the cover and withstand violent strikes.
After enough bass catches, all jig skirts start looking a little ragged. Strands will start breaking, falling out, or congregating on one side of the jig. If this happens when the hook is worn out, and the head pounded, it’s best to tie on a fresh jig. But if there’s still some life in those, replacing or rebuilding the skirt is easy.
The strands of skirt material — usually sold in “tabs” — and rubber collars or wire are easy to procure, whether from a local tackle shop or the internet. If you go the collar route, you’ll need a tool that expands it so tabs of material can be inserted.
A full skirt requires two to three tabs of material. Use more if you want a bigger profile or slower fall; less material makes your jig appear smaller and sink faster. Divide the total amount of material by the number of colors you plan to use. If you’re tying a black and blue skirt, plan on one and a half black tabs and half of a blue tab. If you’re adding strands of flash, don’t include them in your calculation. They add very little bulk.
Pull the material through the collar, so it's centered, release the collar from the tool and cut the ends of each tab to release the strands. When you slide the skirt on the jig, the material will fold itself. Securing material with wire takes a bit more patience and practice. Once the material is centered behind the jig's head, make a couple of wraps, twisting the wire’s ends several times before trimming the tag to about 1/8 inch and folding it against the jig.
Adjust the hook
The business end of your jig is the hook. New jigs equipped with super-sharp modern hooks need nothing more than a quick visual inspection, ensuring the point and barb are straight and ready for action.
Some jigs have a traditional bronze hook. These are strong and proven but often require some TLC with a sharpener before use. A fine file, small sharpening stone, or purpose-built hook sharpener will handle the work. Make short angled passes across the top and along the sides. The objective is to create a point and three cutting edges. That will cause the hook to grab and penetrate when you set it. It’s sharp enough when the point grabs when dragged across your fingernail.
Sharpness is only half the battle. Your jig’s hook also needs enough gap to grab and hold bass. So, look at it in profile. If the vertical distance between the line tie and point seems too small, use a pair of pliers to grab the hook where its shank first bends. Slowly rotate your hand, increasing that distance. But don’t go too far — 10 or 15 degrees is probably the most you can add without reducing the hook’s holding power.
Regularly inspect your jig’s hook after catching bass or freeing it from a snag. It doesn’t take much stress to roll over the point, which keeps the hook from digging in on the set. Hooks break, too. And jigs rigged with soft-plastic trailers shouldn’t be stored for any time. They’re filled with salt, which becomes corrosive to metal when exposed to water. There’s no need to worry during a fishing day or if you’re rigging rods the night before a fishing trip. But if it will be a while before your jig sees action again, save its hook by removing the trailer before stowing it.
Give them a cleaning
After completing the previous service points, give your jig a bit of a cleaning. Remove any paint or clear coat clogging the line tie on brand new jigs. While the hook of a different jig will do the job, a better tact is purchasing a tool designed to do the job. They are inexpensive, especially when you consider the cost of replacing the jigs ruined while tackling the same job.
Clear any remnants of old knots from jigs that have seen action. It’s simple, but it will save you time on the backend. Clean off any piece of aquatic vegetation, no matter how small. It can hold moisture depending on how much is there, leading to weakened skirt collars and rusty hooks. And it’s much easier to remove when it’s fresh and moist than old and dry.
Store your dry and tuned jigs in small resealable plastic bags, which are available online in lure-building stores. The ones that measure about 2 inches by 3 inches are perfect for a single jig and sit upright in deep utility boxes. You can write the jig’s weight and color on the outside, so you’re more efficient when searching for the right one or remembering the specifics when replacing it. Summer and hot bass bites always seem to be over before we know it.
Select your options
A jig will catch plenty on its own. But slide a trailer on its hook, and it becomes more versatile to anglers and more attractive to bass.
While traditional pork chunks have recently been reintroduced to the market, soft-plastic trailers like craws and chunks are the most popular jig trailers. They come in almost unlimited colors and sizes and are easy to rig. They create a range of actions, from big floppy appendages to swimming legs. If you want to use a heavy jig to increase your pitching accuracy but want a slow fall, for example, a bulky trailer will make that happen.
There are two schools of thought for rigging soft-plastic trailers — sliding onto the hook, like a grub on a lead head, or once through the front edge, like a pork chunk. Both have their places. When you want a bulky profile and a long-lasting chunk, slide it onto the hook, using a dab of glue to lock it down. If you want more action from your chunk and a longer profile, use the traditional hooking method.
Adding rattles to your jig is worth consideration, too. Drop a jig equipped with them into a clump of vegetation, shake it in place, and draw in bass with its sound. They are available in several models. Ones that attach to the hook shank can help hold trailers in place. And some skirt collars have tabs to attach them. Build your skirt with these, and you’ll have the option to add or remove rattles whenever you want. Some can be inserted into trailers, although they aren’t as loud as those affixed to a jig.


