| For more information: |
Once in a while, a new fishing technique comes along that is so easy and successful that it gains great popularity in a very short time. The drop shot rig, or down shot rig (drop shotting), has become one of those techniques.
While at the Texas Fishing and Outdoor Show in Mesquite representing Pure Fishing, I did several seminars on the bass tub. It didn't take me long to realize that this technique was one of the spectator's main interests. The bass in the tank also had a considerable interest in the drop shot rig.
From past experiences, I knew these bass-tub bass could be very finicky about hitting a bait for the first day or two of the show. So, I went right to the dropshot rig. It was a big success with both the audience and the bass. This way of fishing is not necessarily one of the best ways of becoming the next state record holder, but it can accomplish five good bites on those tournament days when there isn't much of a bite to be had on the whole lake. In other words, when fishing is tough.
The best knot I have found to use on the drop shot rig is the old standby Palomar knot. After several years of working with my guide customers on their knot-tying skills, I have found that the Palomar knot is the simplest and quickest knot to tie correctly for drop-shot rigging.

Figure 1 shows the starting loop for a Palomar knot. Be sure to make the loop long enough so that the tag end of your finished knot is long enough to attach the Owner down shot sinker 12 to 36 inches from the hook. Notice how the loop is started from the inside shank of the hook. This keeps the hook facing upright when you're finished.

Figure 2 shows a simple overhand knot, creating a loop larger than the bait you are tying on. Notice the angle of the eye on this hook. This is a unique creation from Owner Hooks. It is designed to give the hook more horizontal lift.

Figure 3 shows passing the loop down over the hook. Again, it's essential to hold the eye of the hook with your thumb and finger and very carefully pull the slack out of the knot. You can help the line tighten on the eye by wetting the line and "feeling" the line into place.
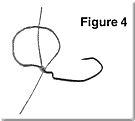
Figure 4 shows the final step for tying the hook on. Take the end of the tag line, go back up the line, and run it down through the eye of the hook. Again, this must be done from the inside of the shank. This will help support the hook to stand out at a 90-degree angle from the line.
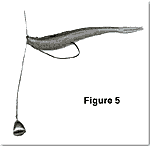
Figure 5 shows the completed drop shot rig using the Owner Down Shot Offset Hook. This is a weedless way of fishing the dropshot rig. I recommend this way of rigging for most weedy lakes and shallow-water casting. Notice the cone-shaped weight on the end of the line. This is another design from Owner Hooks. This is not a regular casting sinker. Instead, it has a line receiving eye that makes it easy to attach and to change weight size as needed. The bell bottom is extra large, so it drags harder than an average weight, allowing you to use a lighter weight and keep in touch with your bait.

Figure 6 shows the original drop shot rig using a straight shank hook. This nose-hooked system works well in open water. You can add as many hooks as you can handle. However, if you are fishing it straight down, as I do on Lake Fork during late fall and early winter, it becomes a fish-catching technique, not just for bass. I have caught bass, catfish, crappie, and brim in the same spot.
I recommend all first-time users practice tying the drop shot rig at home. If it is not set up correctly, you will not likely get the desired results.
You might want to make a copy of the knot-tying instructions for on-the-water reference.
Regarding line requirements, a light low visibility line is recommended. How light is up to the individual, and you are fishing by the body of water. To me 12-pound test is light, 10-pound is really light. For my standard drop shot rig, I use 14-pound Sunline Sniper. It has a hard finish that helps hold the hook at the correct angle and has extremely low visibility.
If you do a lot of casting with a drop shot rig, you might want to put a small swivel about 12 to 18 inches above your hook. If you experience a lot of line twisting in the first hour or two, that is a good indication that you are fishing it too fast. You should spend more time "shaking" this rig with your rod tip than retrieving it. Keep in mind that the intent of this technique was a light-line, controlled depth and finesse presentation by keeping the bait in the same place for an extended period.
As far as what baits work best, that is like many other fishing techniques. Whatever you have the most confidence in will work best for you. Just remember to keep it small so that a light shaking action or current will keep it moving.


