One of the most underutilized and misunderstood of equipment in today's bass boat is the depth finder. At a recent Bass Fishing Techniques A-Z seminar, one angler was overheard commenting, "I paid over $400 for a machine to tell me how deep the water was that I was fishing in." At the end of the seminar, the same angler said he was "amazed" at how simple the depth finder was to operate and also at how much information could be learned from the picture displayed on the screen.
The first step in being able to gain the most information available from the depth finder is making sure that you have a depth finder that is powerful enough to provide you with the information you need. One of the most common questions asked during the All Star seminars is "What kind of a depth finder should I buy?"
Since most boats have two depth finders, price is always a major consideration. Therefore the short answer to the above question is "the best units you can afford."
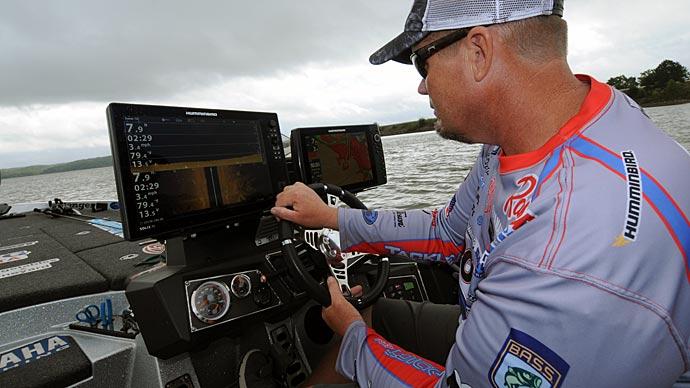
One of the depth finders is then mounted on the trolling motor and the other is mounted on the console by the steering wheel. The best unit is normally mounted by the steering wheel. This allows the angler to move over an area and observe structure and cover without having to stop and put the trolling motor in the water.
You should look for a depth finder that offers the most power (watts), pixels, and features in your price range. Although, the minimum requirements should be 600 watts and 160 x 160 pixels, it is preferable to have a unit that offers 3,000 watts and 240 x 240 pixels. You should also compare different features offered by the different brands. The features can vary from brand to brand. Most companies offer comparable features.
Some of the useful features include:
Split chart capability where one side of the screen projects a normal view and the other side is magnified two to four times. This allows you to get a larger picture of the bottom structure and related cover.
A digital readout on the screen that displays water temperature changes in water temperature from location to location, speed and distance. Note: On most units you have to pay extra for the temperature gauge and speedometer unit. The temperature gauge is essential.
Back light system that allows you to view the screen during nighttime fishing trips.
Now is also the time to consider adding a GPS to the unit. If you purchase the GPS with the depth finder, the installation charges are usually a little less.
Although a depth finder is not that complicated to operate, successful operation does require that you understand the functions of the different settings offered on most of today's depth finders.
The first step to understanding the settings is to read the instruction booklet that comes with the depth finder. It is preferable that you take the book to the lake with you and try the different settings with the boat in the water. This allows you to see what changes the various settings will make in the picture displayed on the screen.
One of the most useful settings on the depth finder is the Automatic feature. The automatic setting is just what the name implies. The depth finder functions properly, in most conditions, and will provide an adequate display for the angler to locate structure, cover and any fish that might be in the area covered by the transducer. Unless you have a specific task for the depth finder, the unit will usually work effectively on the automatic setting.
The Sensitivity control is one of the most important functions of the depth finder. A high sensitivity setting will provide you with a more highly defined view of the existing structure and cover. Also, if you are having trouble marking fish that might be in the area, a higher sensitivity setting might provide a more distinguishable view.
However, if you are in an area that has a lot of suspended debris or heavy cover, it is advisable to reduce the sensitivity and eliminate much of the "noise" that will clutter the screen.
On most units a sensitivity setting of somewhere in the 75 to 80 percent range is suitable for the majority of conditions the average angler might encounter. It is important to note that on most units the sensitivity can be adjusted to different levels while the depth finder is set on the automatic mode.
Don't hesitate to change the sensitivity setting to observe the display at different settings. This is one function with which you definitely want to be familiar with.
The Upper and Lower Limits setting allows the angler to segregate a defined area and apply all of the depth finder's resources to providing an enhanced display of that area. This will provide a detailed view of the selected area.
Example: You are trolling in 25 feet of water and want a more detailed display of the bottom area. First, put the depth finder on manual mode then set the lower limit to 25 feet and the upper limit to 20. The depth finder will provide a more detailed, magnified view of only areas in 20 to 25 feet of water. Areas outside of this range will not be displayed on the screen. This setting can be extremely useful when exploring unfamiliar water and looking for breaklines and cover that would normally attract largemouth bass.
The Zoom function is extremely useful when you are trying to interpret the details displayed on screen and are having trouble reading the details. The zoom can also be used while the depth finder is on automatic.
You will usually have the ability to zoom to four times the normal screen size. Also, many depth finders offer a split screen where one side of the screen always operates on the zoom mode while the other side operates on the normal mode. Many anglers choose this display as their regular display.
The Chart Speed can also be adjusted in the event you need the ability to better observe the information displayed on the screen. With control, you can slow or even stop the movement of the information moving across the screen of depth finder. This will provide you with all of the time you need to analyze the details provided by depth finder.
In normal operation, the char speed should be left at the fastest setting and it is helpful to pay particular attention to the right side of the screen since that is the area that is currently being moved over.
The Fish ID is a function that is better left in the "off" position. When the Fish ID is turned on, it displays everything that is not attached to the bottom as a small fish figure. A depth finder with the Fish ID turned on has difficulty distinguishing between limbs, bubbles, turtles, trotlines, etc.
This also prevents the angler from being able to distinguish between balls of shad and other types of fish. In order to properly analyze the information provided by the depth finder, it is necessary to be able to differentiate shad and other types of fish from bass.
Once you have a working knowledge of how to properly adjust the depth finder, it is equally important to be able to interpret the information provided by the unit. One of the most common complaints voiced during our seminars is that the angler is unable to mark any fish with the depth finder.
In all probability, the angler is seeing fish and does not recognize them as fish. In all of the ads used by the companies that sell depth finders the fish is clearly visible and is marked by an arch or an inverted V figure displayed on the screen.
Unfortunately, the real world is seldom that simple. In order for the screen to display a perfect arch, the fish must be in the center of the sound beam emitted by the transducer.
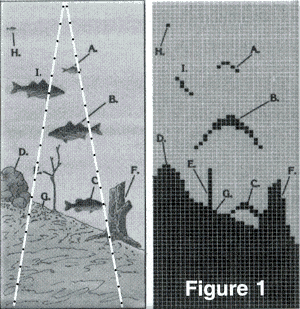
If the fish is off center, the display will show a portion of the arch figure. The amount of the arch shown on the screen depends on how much of the fish is in the cone shaped beam area of the depth finder. Figure 1 displays how this beam is shaped and what fish might look like in the screen if they are in different areas of the beam.
The transducers that are standard on most depth finders offer a I5- or 20-degree angle. In shallow water (less than 10 feet), for example, it is possible that the depth finder is reading an area less than 3 or 4 feet wide. (Notice the narrow beam illustrated in Figure 1). Additionally, in shallow water, the beam is much narrower than at the bottom, thereby having less of an ability to produce a readable beam on the display.
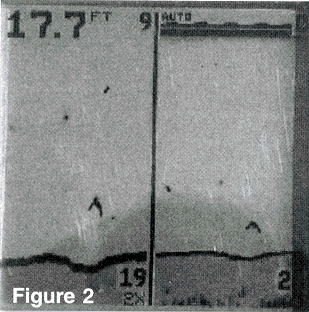
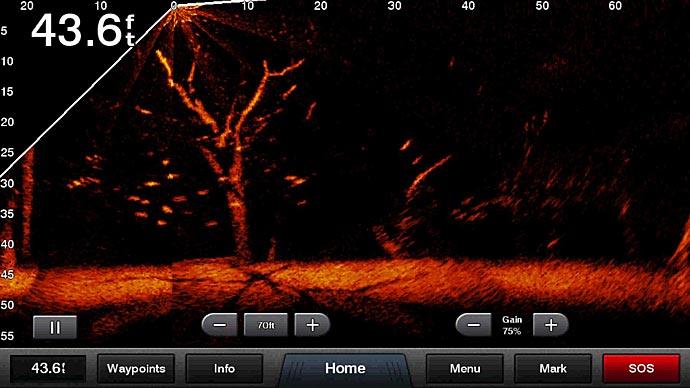
The arch is often thicker and longer on one side. A fish that is darting quickly through the beam, a boat that is rapidly moving over a stationary fish, or a fish moving the opposite direction of the boat cause this. Observe the fish displayed in Figure 2 and notice the uneven shape of the arch. If the boat and the fish are both stationary, the display will show a straight line as opposed to an arch. Figure 2 shows a fish arch in the middle of the screen. Although the arch is not well defined, it is still clearly visible. The depth finder used in this example was a unit with 600 watts and 160 x 160 pixels. A more powerful unit, for example, a 3,000 watt unit with 240 x 240 pixels, would have displayed a much more defined arch.
The small dots located in the top part of the display are probably small fish or floating debris. Again, a more powerful depth finder could possibly provide enough detail to identify the objects.
The fish shown in Figure 2 is in all likelihood not a bass. Bass are structure-oriented fish and will seldom be found in a flat area without structure or cover, which is absent in Figure 2.
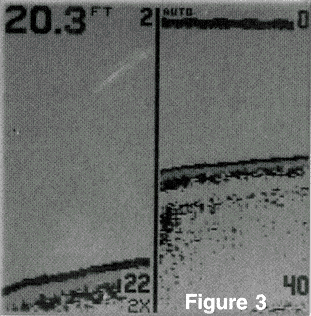
Notice the bottom gray bottom line in Figure 2. The gray area is well defined and wide enough to show that the bottom is firm. A thinner line such as the one shown in Figure 3 shows a bottom that is not nearly as hard and does not reflect the sound waves which are broadcast by the transducer as efficiently as the firmer bottom displayed in Figure 2.
The fish shown in Figure 4 are almost certainly bass that are feeding. Observe that the fish are located above and below a gray ball with the black ring surrounding it. The gray ball is a ball of shad. Notice that the ball does not appear in any way to be connected to the bottom. It is not uncommon to see two or three balls of shad or even one huge ball of shad. The balls of shad usually have an irregular shape.
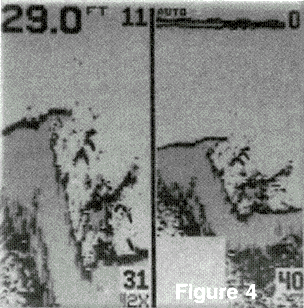
Figure 4 also shows a stump to the left of the sharp drop of the bottom. The object is distinguishable as a stump because the continuation of the gray into the object, which indicates it is connected to the bottom.
Also, notice that the bass is located at a sharp drop (breakline) on the bottom. As mentioned earlier, bass are structure-oriented fish and will almost always be located in or around a breakline or some type of cover. If the bass portrayed in Figure 4 had been positioned on top of the stump or to the right of the breakline, away from the shad, it would have been an indication that the bass was not feeding.
Hopefully, this information will provide you with a better understanding of the capabilities of the depth finder. The more you use the depth finder, the more you will rely on it to provide you with valuable information that will help you eliminate unproductive water and find the breaklines and cover that will produce active bass.
If you are interested in reading more about depth finders, Lowrance Electronics has a tutorial at www.lowrance.com. Other companies with information about their products are Garmin International at: www.garmin.com Humminbird at: www.humminbird.com Raytheon at: www.raymarine.com.