I fully expect to be taunted by several of my fellow anglers by writing about a bobber and crappie jig technique that happens to involve a 10-foot fairy wand in any serious bass fishing publication. But I can guarantee you one thing: if your lakes meet all the requirements and conditions for this technique, and you put this tactic to work for you, I can guarantee your success and, not to mention many wintertime memories. I haven't written about this technique in the local journals I write for until now because I didn't want it to gain much notoriety. It's pretty powerful and is probably one of the easiest, if not the easiest, technique to master in all fishing.
As a Spotted Bass guide in Atlanta, GA, I have found it imperative to become an extremely versatile angler. Due to the nature of spots and their finicky nature, you have to be just as comfortable fishing deep as you are shallow and be strong at many different techniques to be successful throughout the year. Those that are one or two-technique wonders are usually strong in certain seasons but lack in others. But the most successful spotted bass anglers I know can do it all and also know how to fish for suspended fish, which is what this float and fly technique mainly revolves around.
In my many years of fishing for Spotted Bass, the one thing that I have learned is that big Spots spend the majority of their time in a suspended state. I had to think back on all the big spots I have caught; 90% of them were caught in a suspended state. My favorite big spot lures are swimbaits, spoons, Float-N-Fly, and Topwater. Those lure choices can effectively catch suspended fish, especially over deep water. So that's part of why the Float-N-Fly is as effective as it is with bigger fish because it is strictly a suspended fish technique and causes you to fish for suspended fish 100% of the time. The more I find myself targeting suspended fish, the more successful I have become in catching bigger-sized fish.
In the mid-90s, I visited a tackle shop near Bristol, Tennessee, while on vacation with my family. I always like to check out the local talent to see if there is anything unique I could bring home. While visiting this particular shop, I met a gentleman talking about this Float and Fly technique for catching trophy smallmouth and spotted bass like candy in the dead of winter on their east Tennessee impoundments. Little did I know, but much later, through research and phone calls, I discovered he was the "Father" of the Float and Fly, Charlie Nukols. I remember spending about an hour with Charlie, listening to him and asking him questions about the technique so I could try it back home in Memphis, TN, where I resided. I bought the rod, the jigs, the floats, and the small diameter monofilament line (Fluorocarbon wasn't an option for bass anglers back then) and enough information to be dangerous. When I tried the technique, I had instant success. I still have the rod I got from him. It has zero markings and is a reasonably heavy rod compared to our more modern rods.
Along with some help and support from other friends that I have in East Tennessee, Tim Maxfield and Matt Lewis, just to name a few, I was able to refine what I have already learned from Charlie. I have dabbled on and off with the Float-N-Fly for several years due to moving to areas (Texas/Mississippi) lacking smallmouth and reservoirs with suitable spot concentrations. However, during the coldest days of winter, I usually hang up my rods, put my boat in storage, and spend much time in the deer woods hunting. Now, with the Float-N-Fly in my arsenal, I don't deer hunt nearly as much as I used to.
Winter Suspenders
The Float-N-Fly was born in Eastern Tennessee, and it started when the crappie anglers in the area were complaining about catching smallmouth while fishing for crappie by fishing crappie jigs under a float. What happens in the dead of winter is that once the water temp gets in the 40s, the fish become less active and less prone to chase lures. I know that in my 25 years of fishing for spotted bass, they spend much of their time suspended after a cold front passes. It only made sense that this Float-N-Fly technique would work. I spent many years targeting these suspended fish because they were typically bigger than the fish I caught with other tactics in the winter. While learning the Float-N-Fly, the jigging spoon was my favorite suspended fish bait, followed by the Fish Head spin and the Lucky Craft Staysee 90. But the problem with these three baits is that they could not stay in the strike zone for ample periods and don't offer an extremely subtle presentation for these relatively inactive fish. Let's face it -- fishing for reaction strikes in the dead of winter is a tough sell for any bass. A subtle presentation at the desired depth that the fish hold is the absolute KEY to catching these wintertime suspended fish, and that is where the Float-N-Fly shines.
The Equipment
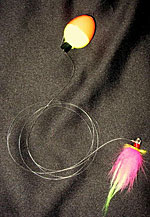
The float used in the Float and Fly technique is the most controversial, depending on who you ask. The balance between your fly and your float is paramount for this technique to be 100% effective. Let me explain. You are suspending a 1/16 fly (Hair jig) from 8 to 23 feet deep under a float. When we were kids and saw the cork go under, we would set the hook. But we are dealing with extensive leader lengths and lethargic fish.
What happens when a fish eats the fly but moves upward in the water column and doesn't sink the float but has your hair jig in its mouth (called a "lift bite")? You will never know if you have a bite with a standard float unless you see your float sink. Well, with this particular balanced setup, when you cast out your fly on a long leader, the float will lay on its side until the weight of your fly gets to its desired depth and turns the float over vertically. So when you get a lift bite hit on your fly, you will notice that when your float turns over on its side (horizontally), you have a bite, OR your bait is on the bottom. So, you need to pay attention to how long your float takes to go vertical directly after the cast to ensure that a fish hasn't taken in your offering. Also, remember what color you see on your float when your float is vertical. Any other color you see means you have a bite or your fly is dragging on the bottom. It takes some getting used to, as in bass fishing, you usually feel the bite or see them hit your bait, but in the float and fly, your cork turns over on its side. It's weird at first, but after the first time you see this happen, you will quickly learn to pay attention to the float colors you are seeing. This is why it's a relatively simple technique but very specific due to the importance of this balance between the float and the fly. It has been my experience that about 10-15% of the bites you get will be lift bites. It's still a reasonably small margin but enough to make it worth your while to pay attention to the balance of your cork.
If you get a wild hair and try to improve upon this system with a slip-float rig, DON'T! There are two problems with the slip-float idea. One is that a 1/16oz jig is generally not heavy enough to make the line slip through the cork effectively. The second problem is that when you gently pop your float to make the fly dance, your fly will eventually work its way up the water column, defeating keeping your bait at a desired depth. This also messes with your ability to determine if you have a lift bite by a fish on your bait. Can you make this system work? Absolutely, but it's not worth the hassle in most applications. However, it is used in fishing inside boat houses where more accurate casting is needed.
Advanced Bobbers 201
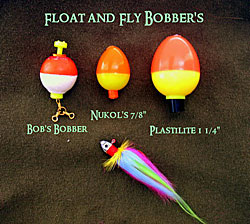
If you read many articles on the Float-N-Fly, you can be easily confused, causing you not to experiment with different things within the technique. I'm a tinkerer to the highest degree, and I wasn't satisfied fully with the bobber choices that are out there. You have many different bobber systems with the Float-N-Fly, and they all work to a degree, but they all have disadvantages. The two main systems that come to light are Bob's bobber system, which involves a custom-made internally weighted styrofoam bobber and a small #4 size three-way swivel. The other school of thought is the Nukols system, which includes a simple 7/8" or 1" inch pear-shaped float. I will go over the advantages and disadvantages of both systems and also add the details of what I use that is a good compromise of both systems.
Nuckol's System
When the Float-N-Fly was being perfected by Charlie Nuckols (the father of the Float-N-Fly), He experimented with several different types of corks. Charlie's system comprises a simple 7/8" inch or 1" pear-shaped float. The beauty of this rig is in its simplicity. There are no knots or 3-way swivels required. You slide the line through the clip, and with this method, you can easily slide your bobber up and down the leader to adjust your leader depth without having to retie any knots or create a new leader. One of my favorite reasons for liking this system is that if you get hung up on the bottom or snagged in some overhanging limbs, all you have to do is take your bobber off, reel the tip of your 10-foot long rod to the fly, and dislodge the fly off with the rod tip then reinstall your bobber, and you are back to fishing. Since no three-way swivel is involved in this method, no lure retriever is needed on most occasions. Those two reasons alone are huge time savers and prevent a lot of retying knots as if you were using a three-way swivel method. Another advantage of the pear-shaped float is that it costs .25 cents a piece. However, the most significant disadvantage of Nuckol's is its castability (even harder than the Coan method and especially in the wind, which I will talk about next). It's a tough deal casting a weightless bobber, and it's a little hard on the eyes watching your bobber for a lift bite or even seeing it for that matter, especially in a light chop.
Bob's Bobber
The Bob's Bobber system was designed by Bob Coan, a well-known Guide and Float-N-Fly enthusiast on Dale Hallow Lake in Celina, TN, where the Float-N-Fly technique was born. The Bob's bobber is a modified weighted styrofoam cork.
The advantages of Bob's bobber are that with a weighted bobber and a 3-way swivel, it makes it easier to cast (although there is still no cakewalk in casting it, especially in the wind) than the initial way that Charlie came up with. Seeing a lift bite from a distance is also a little easier. However, there are a few disadvantages of the Coan method. The most significant disadvantage is that you have two extra knots to tie. You have the braid tied to one loop on the three-way swivel, your fluorocarbon leader tied to the other swivel, and you clip on the bobber to the 3rd loop. I don't know about you guys, but my hands don't work well in freezing air temps in the winter, tying knots with line the diameter of sewing thread. Another disadvantage of the Coan method is that it disallows you to change your leader length at an instance without breaking your line and retying it to adjust the leader length, which is extremely important to ensure that your fly is at the correct depth. Another disadvantage is that these corks cost $5.00 for a pair. I will admit you rarely lose corks using this technique, and you can make your own similarly weighted corks if you prefer to cut costs.
The bobber method that I use is a combination of the Coan and Nuckols method. The float that I use is a 1-inch pear-shaped Plastilite brand float. Be careful when you go to measure a float. Many people think you measure the float by the LENGTH of the float, but in actuality, you measure the diameter of the float to get the correct 1-inch measurements needed for this technique. The ones that I have are half orange and half yellow, and they are just like Charlie Nukol's 7/8" and 1-inch bobbers, but I am using two sizes bigger than the 7/8 inch cork, which is the 1-inch size, and Christie has these in stock at Natures Tackle Box.
With no wind, this method works perfectly and casts like a rocket due to the added weight of the cork. Even with pretty stiff winds, you can still use your float to decipher a lift bite when it falls horizontally to its side. It's a bigger cork so that you can see it easier, and as stated earlier, you can cast it easier. When you get hung up, you can still take your bobber off, put it in your pocket, and reel your rod tip down to your fly and dislodge it from its hangup, saving time and money. I sometimes take a Sharpie and mark my fluorocarbon leader to know what depth to reinstall my bobber. Also, since the bobber is heavier, it packs your line tighter on the spool of your spinning reel, causing fewer overruns.
The only disadvantage of this method is that during pretty windy days, the wind can tilt your cork slightly (due to the bobber being more prominent and more exposed above the water's surface). The wind can drag your line and cause your cork to sit at a slight angle, which happens to a degree with all three methods, and that can cause you some confusion on whether you have a possible lift bite. The way that I fix this is to attach a three-way swivel to the bottom of the 1 1/4" cork and use it as a counterweighting mechanism and not as a line attachment method. Just hook the three-way swivel onto one of the wire cork hooks, and you're done. The unique thing about a three-way swivel is that you can cut off a limb or two on the three-way swivel with your pliers to get the perfect balancing of the cork while fishing in the wind.
I have found that when fishing with this bigger cork, I can cast longer leaders much more easily and accurately, and I have noticed that when I get a bite, they tank this cork under, unlike Bob's and Charile's methods. You often get very subtle bites with the smaller cork, but with the bigger cork, it takes more for the fish to sink it, and it goes along with the exact reason why I use a heavier dropshot weight than most. When the fish feels added pressure, it grabs the bait harder.
In closing, on the topic of bobbers. All three methods have been proven over time, and they work very well. The story's moral is to experiment with each method, find out what works best for you, and try to improve upon your dislikes of each method. I doubt I will find a better bobber solution than I have already found. Almost ANY bobber will work with counterweighting as an option, including both weighted and unweighted corks. I have taken out quite a few experienced Float-N-Fly enthusiasts on guide trips, and they all loved the bigger bobber concept and have incorporated it into their Float-N-Fly system because it is an improvement over traditional methods.
Rod
The other important aspect of this system is the rod. The best way to describe the rods used in a float and fly are long and limber, much like a fly rod. The lengths of most Float-N-Fly rods are 8 to 11 feet. I use a 2-piece 10-foot Silstar and a 9-foot 6-inch Bass Pro Micro lite rod. The purpose of such a long and limber rod is to cast a float and fly with long leaders (8 to 23 feet long). The second important is to fight and land a fish on a relatively light line (2 to 8-pound test). Some companies make rods just for the Float-N-Fly technique. I know G-Loomis, All Pro, B 'n' M Poles, Silstar, and St Croix have Float-N-Fly models.
Some guys use long crappie rods in a pinch with great success. You don't need a high-end rod to catch fish on the Float-N-Fly technique, as rod sensitivity is of ZERO importance here since you're just watching a cork to determine if you have a bite. You want a long spinning rod with about a 2/3rds flex, and you should be good to go. Remember that a 10-foot rod will be more cumbersome than your standard bass gear, but the key here is to find a rod that balances your outfit and is lightweight and comfortable. Plenty of good choices exist without spending more than $60.00 for a Float-N-Fly rod. It is my opinion over the years that longer Float-N-Fly rods are better. They can give you greater casting distance, and you are more apt to throw longer leaders more effectively with a longer rod. Surprisingly, there is a significant difference in casting distances between a 10-foot rod and a 9-foot 6-inch rod. The only modification I make on my float and fly rod is to mark the rod at 2-foot intervals upward from the BUTT end of the rod. If I know my rod is 10 feet, I know that if my leader is flush with the butt end, I have 10 feet of leader line. So what I am doing now is marking my rod with small pieces of tape in 2-foot intervals from the butt so I can quickly determine where to install my cork when I want to fish with leaders that are longer or shorter than 10 feet by using the tape markings I have set on the rod as a means of having a more accurate guideline. I go a little overboard with this, but leader length is critical to the technique. I get many questions about how to store your rods with such long leaders. I just take my cork off and attach my fly to a guide. Using a Sharpie marker to mark your leader or the tape leader trick mentioned above makes those tangles a lot less apt to happen.
The Fly
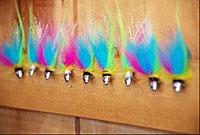
I have experimented a good bit with the different types of flies/hair jigs, and I have spent much time virtually watching the action that the different types of hair jigs emit in an aquarium. Most Flies consist of a 1/16oz hair jig; some use readily available marabou or crappie jigs. I prefer the hair jigs, but when the fish are biting, they will sometimes hit any bait. The biggest thing to worry about on a tough bite with the hair jig design is the profile of the jig and the weight. Not only is length significant but also thickness as well. It has gotten to the point that I buy my flies custom-made by master fly tier David Lester of Natures Tackle Box in Hiram, GA (678-567-1211), who has recently started his own custom Float-N-Fly company called Georgia Tackle Georgia Tackle Custom Flies.
There are many advantages to using a custom-tied fly. Some advantages include a better variety in colors, longer lengths, and more hair (in some cases) to allow the angler to customize the profile of his fly (shorter, longer, thinner), sharper hooks, and 3D eyes for added realism to the bait. David uses a laser-sharp Matzuo Sickle Hook that will easily stick in your fingernail when tested for sharpness. He uses basic fox hair combined with feathers and other types of craft hair that you can get at most fly shops, and it gives you the best of all worlds by having a little bit of everything in the mix. David also uses a proprietary material called "Chigger Hair," which is an old fly-tying secret that trout anglers have used over the years. When you watch the fly in action in an aquarium, the chigger hair moves fluidly and expands some, and it looks more realistic than any other hair I have seen.
The good thing about most custom flies is that most tiers use the whip finisher knot, which is by far a superior knot to secure the thread/hair to the head of the fly without it unraveling after a few fish. Also, a good dose of glue around the wraps adds more insurance that many commercial flies don't offer. These are just a few of the advantages you incur when making your own flies or buying custom ones. If you use commercially made flies, you can easily tell if they use glue to secure the wraps due to the slight gleam on the wraps that is put off by the epoxy/glue. If you don't see this gleam, glue the wrap area on the fly to get better securement, or eventually, they will come unraveled and start losing hair.
I like my hair jigs made to about 1 to 2 inches, and there are times when I have a bite, and I will miss the fish due to them soft-mouthing the hair below the hook. This is when I will cut the hair down shorter with scissors to make the jig profile smaller to enhance my hookups. But many times, I like my flies bigger, especially in stained water applications, to help the fish locate the fly and give off more vibrations for the fish to key in on.
As far as hair jig weights, I use 1/16 oz heads. The reason is that these weights look the most natural when giving them action. The 1/8oz head doesn't have that natural action that the other two sizes have and is just too heavy, in my opinion. When you test the action of a 1/8 oz fly in a demo tank and impart action to it, it goes up instantly and falls pretty fast, giving off a very unattractive action and not looking fluid. The smaller-sized heads mentioned above are much more fluid-like and realistic-looking.
Another thing I like in my flies is a hook with a bigger bite, with the hook point being a round bend versus an inward bend hook, which makes you more apt to skin hook a fish versus hooking the fish solid. The bigger the bite and the longer the shank, the less chance you have of not hooking a fish or skin hooking a fish. I open the gap of my hook about a 1/8 of an inch for even more bite. Due to this, my fly has a slightly wider gap and longer shank, which will increase my hook/land ratio significantly.
The biggest thing you need to realize about this technique is that it is a very ultra-finesse type technique. The fish are very lethargic and inactive and will get close to your bait to inspect it and smell it. I purposely don't paint the heads of any of my hair jigs and use them unpainted (plain lead appearance). 90% of the time, I use a color called "Spot Candy" and "Spot Sushi" made by custom fly tier David Lester of Georgia Tackle, composed of craft and fox hair with some purple pearl crystal flash mixed in. This color is excellent for both very clear and stained-colored water. Spotted bass are notorious for liking off-the-wall and bright colors. I'm a massive fan of using painted chartreuse and white blades with pink in my spinnerbaits, and I do exceptionally well with these off-the-wall colors because they have the best visibility in stained and clear water. Sometimes, I will go to a darker color option as well. But the most important thing to me is to fish with a color that gives you the most confidence. Confidence is the best color in any angler's Tackle Box. My other favorite color is white fox hair with yellow neck feathers.
I use a few other baits in a pinch in place of the hair on a 1/16oz and 1/32oz jig. I do very well with the Gary Yamamoto 2-inch Yamaminnow and 3-inch Tiny Ika's and Tiny Flukes. Sometimes I will bite a little off the Tiny Ika to keep in line with the size of the hatch I am dealing with now. Gulp 3-inch minnows are also becoming quite popular among the locals in East Tennessee. Again, play with these things in the sink or aquarium to understand their action in the water. You will be surprised by what you can learn about fishing by playing with baits and watching the action they emit in the kitchen sink or aquarium. Another thing that I am starting to do is bringing along my 10 foot cast net on my fishing trips, and when I see bait deep on my graph, I will net some bait to get an idea of what size bait I am dealing with, and then I will adjust my bait profile appropriately.
Miscellaneous
The rest of the ingredients as they pertain to equipment for the Float-N-Fly technique, the line, and the reel. I use anywhere from 2 to 8-pound fluorocarbon line for the main line, but mostly, I use 6 to 8-pounds. I use Triple Fish fluorocarbon, an excellent quality fluorocarbon that comes at a very affordable price. Without going into a fluorocarbon infomercial, the most significant things I want from this line are less visibility and ease of handling (less memory). The key here is to play the fish out fully before landing it since you're using a reasonably soft action rod and light line.
Another twist pertains to the line: using braid as your main line. This is the only way to fly with the Float-N-Fly outfit, as it performs very well on spinning equipment and has zero stretch for setting the hook on a soft action rod like a Float and Fly rod. I prefer using a brightly colored braid as it aids a lot with determining how much slack you have in your line by being able to see it. I like Power Pro in Yellow and Fire Line Crystal in white both in 8 or 10-pound test. Another advantage of the colored braids is that they are easier to untie tangles if they arise. Both mentioned above are great braids and handle very well on spinning equipment, especially if you fill them up flush with the spool's edge. The braid handles better on spinning reels than most lines, and I adjoin the braid to a 15-foot fluorocarbon leader, which is joined to the braid by using a uni-to-uni knot. I make my leader significantly longer because I like to make sure my float is attached to the fluorocarbon part of the leader because the braid will float. Having 15 feet of fluorocarbon as a leader gives me multiple times to retie and plenty of room to adjust the float/depth of my fly. If I break off on some underwater structure, my line will usually break close to the knot and leave me enough leader material so that I won't have to tie on another leader. This still gives me plenty of room to attach my float to the fluorocarbon leader.
The reel part of the equation is to ensure you have a 2000-size spinning reel with an incredibly smooth drag, or if you prefer, you can backreel. I use the Ardent S-400M. The Ardent 400M handles fluorocarbon incredibly well and can micro-adjust the drag setting using finesse size lines. The reel is the least important component in Float and Fly fishing.
The Casting Technique
There is a technique to follow when trying to cast your Float-N-Fly rig, which contains a bobber and a 1/16th oz hair jig on a 12-foot leader with a 10-foot rod. The longer rod allows you to throw such a lengthy rig effectively, but the technique lies in how you cast the rig. With the rod in front of you and the float about a foot to a foot and a half below the rod tip, extend your arm back over your shoulder and lay the jig out by letting it hit the water. Then go forward with the rod tip and release the line, and the rig will propel forward. It is KEY that you let the jig hit the water on your backhand. By allowing your jig to hit the water behind you, the jig is loading up your rod tip. When you thrust forward to cast, you force the jig out of the water, which loads up the rod tips and propels the rig forward. Having at least a foot between the cork and your rod tip lessens the helicopter effect, thus giving you more accuracy and more distance in your cast. Also, please don't force the bait by trying to cast it harder, thinking it will cast farther. To cast it correctly, ensure your casting arm stays mostly extended during the entire cast. This gives you an excellent lob cast, giving you the best distance and casting accuracy.
Float And Fly Conditions & Tips
The Float-N-Fly shines in particular situations. The ideal conditions are relatively clear to very clear water (3-foot clarity and clearer) and water temps below 50 degrees. The clearer the water, the better the technique works. Technically water temps in the mid-40s are ideal, and post-frontal conditions with some wind make it even more effective since frontal conditions make many of the bass suspend and inactive. This is the only time of the year when I pray for post-frontal conditions, as the actual pressure makes the fish suspend, not the cooler air temps. A client asked me what is the best day to go fishing the fly. My response is the nastiest cold day you can find. If you take a peak out of your window and it's nasty and cold with some wind, I will have vivid pictures of MAGNUM spots dancing around in my head. Snow makes it even better as you are assured an overcast day.
I would try to float and fly around many types of structures. I do very well on the bluff walls, at the end of long points, over deep brush, and around docks, boat houses, and piers. A few of us hard-core guys are sinking brush at strategic depths strictly to fish with the Float-N-Fly technique. The biggest thing that I recommend is that if you are fishing as partners and are both fishing the Float-N-Fly, you must make sure both of you are fishing different length leaders. The depth is a crucial aspect of the Float-N-Fly. Varying your leader length with a slideable float instantly allows you to change the depth of your presentation. Typically, I like to make sure my fly is suspended at the level of the fish or slightly above the depth that the fish are holding at. If you look at your graph, note the depth level of the shad, which is plentiful in the winter at shallower depths but suspended over deep water. Strategically, bass hold below the levels of the bait. So I put my fly below the bait to separate itself from the big schools of bait and be above the bass. The reason is that most fish feed upward vs. downward, which follows the same theory that the fish's eyes are on top of its head and naturally feed upward. I like a little bit of wind when fishing with this technique.
The cool thing about the wind is that it imparts action into your fly versus the angler imparting the action. It also gives the fly a more natural action. When there is no wind, I usually twitch my rod tip just enough to tip the cork to impart the action to the fly. When I twitch it, I gently twitch it to get the desired action. Like in jerkbait fishing, you must vary your cadence to determine what the fish seek. I have been doing this long enough to know that a lot is involved in the cadence on those days when the fish are finicky. One person in the back of the boat could easily wax the guy in the front with everything the same, but the cadence. Some days, it's a stop-and-pause deal; some days, it's a long gruesome pause; and other days, they like that fly bouncing up and down reasonably erratically; and sometimes, they like you to pull it a foot or even a slow retrieve, often works. The colder the water temp, the more subtle my twitches are. Again, watch your bait in the kitchen sink or aquarium to see what I am talking about when I say subtle. Remember that the threadfin shad die off by the thousands when the water temps get consistently in the low 40s. When they are dying, they aren't exactly moving up and down but more or less quivering, and that is the action you are trying to imitate with your fly. This is why the Float-N-Fly is very practical: it takes advantage of the subtle movement of a dying shad and spots like to suspend a lot in post-frontal conditions.
I have noticed that the fish are usually shallower on post-frontal days than on pre-frontal days. By shallower, I mean 6 to 8 feet in length. I know that doesn't make much sense, but it is something that I have observed. But it has to do with those post-frontal days, which are usually clear and sunny, and the fish are moving up in the water column to catch the warmer sun's rays throughout the day. In pre-frontal situations, I can be anywhere from 10 to 14 feet deep with my fly, and post-frontal, I'm usually around 8 to 10 feet deep on my fly. In the summertime, I often get my leaders as long as 24 feet to reach the thermocline when it develops, but that's another story for another day.
In closing, don't ever underestimate the Float-N-Fly technique. It will catch them on the nastiest days of the year, and that little fly can account for some truly MAGNUM Spotted Bass when nothing else will. The above is the basics of the Float-N-Fly technique that Mr. Nukols taught me in the early 90s and what I have learned through my own trials and errors. The technique has many variations, but the basics remain the same. Thanks to the late Charlie Nukols for taking the time to talk with me about the Float-N-Fly.
Mike Bucca is the owner of Spot Country Guide Service where he is one of the very few guides in the United States that specializes in catching Spotted Bass.