The idea of writing an instructional article on crankbait making was borne of my own trials and frustrations of not having enough available tutoring at hand, either in print or in person. Of the hundreds of books I own, which encompass almost every fact-minutae of lures, tackle and fishing only a few touch upon the topic of making your own wooden crankbaits. In my research for this article, it was even difficult to locate periodical articles on the subject. Is it because of the myth that crankbait making is difficult? Is it because lures on the market are thought to be better? It is my hopes that this brief article will clearly explain steps to success in making crankbaits that catch BIG FISH. I consider myself a life-long "student of crankbait making" as there is always something new to try and another fish to fool.
From the top
First I should tell you from my own experience that carving and assembling wooden lures is loads of fun. It's hard to say what's more fun, a good day fishing or carving up a lure that makes people think it's a real fish hanging on your line! I'll tell you this though when you put them both together, well its bliss!
Now lets begin by looking to the trees and finding wood that will work well for our little endeavor.
I have found red cedar to be the easiest to work with for several reasons. It is inexpensive and readily available. It also has a good casting weight .Cedar is also easy to sand and can leave you with a pretty smooth surface. This wood will make it easy for you to screw into but does split on occasion, if we're not careful. You can experiment with other types of wood like balsa, basswood or pine.
OK, now that we've selected our wood, we must decide on a shape and that depends on a few things. One is your target species, and it's average size, another is depth range and common forage during the season you'll likely be fishing.
Obviously if it's panfish you're after you're going to want to stick with a shape that's 2-inches or less. Unfortunately these are generally more difficult to make because any errors in the placement of the components is magnified relative to the overall body size. At least until you get the hang of things, stick with something at least 4-inches long, that seems to be a good overall size for lot's of different species of fish should you happen across one.
I've included a 4-in. pattern that you can print out for you to work from:
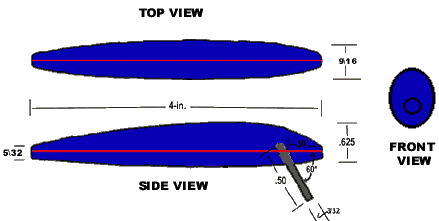
Trace the pattern onto a piece of cardboard and use this as your template for tracing onto your wood block. Use a piece of wood that's clean, free of knots and for this lure you'll need it to be 5/8" thick. Lay your template onto the wood and trace your lure shape.
The Craft
Now this is where it starts to get tricky, depending on your woodworking skills. If you own or have access to a scroll saw (about $100 in store), it'll make this job much easier, if not, the good old fashioned coping saw (about $10) always worked for me.
Note: Always wear safety glasses when working wood.
If you're using a coping saw, place your wood block in a vice in a way that you're most comfortable with. If you don't have a vice use a clamp. Now you want to make sure that you cut as evenly as possible and try to stay just on the outside of your line. After your shape is cut, check to make sure that it's even on both sides (especially if you cut by hand). Wood is cheap and if you're not satisfied write it off as practice and try again.
You must also cut the slot for the "lip" to slide into. This should be done before any carving so that the lure can lay flat on it's side if you're using the scroll saw or it will sit level in a vice if you use the coping saw. Either way you MUST be sure that the slot is perfectly perpendicular to the lure body. The slot in the pattern included shows the slot with 3/32" thickness. I have found this ideal for the our lure body. You can adjust the thickness to suit the plastic you may have available, however I would not go any thinner than 1/8".
Your lure should look just like this:
Now you should have 4 equally spaced sections on the top and bottom of your shape. Again using your middle finger as a chock, run a line equal in width to your sections along the curved edge on both sides of your shape.
The side view should look like this:
The bottom should look like this:

Now you'll need a carving knife and I don't mean the one that grandma used to carve the turkey. There are plenty of good carving knives you can buy in a wood working store and I use them exclusively. They're great for the job and you can even carve details into your lure for a more realistic looking 3D effect (I think this impresses your friends more than the fish). However all you really need to get the job done is a box cutting razor or something similar as long as it has a sharp blade.
Note: Most accidents are caused by a blade that's not sharp enough or trying to take off too much wood in one pass.
Now it's time to start carving so put your safety glasses on!
First, get a good grip on the lure with one end on the table you're going to work on. Carefully and slowly begin to carve out all your edges using the lines you made as a guide.
Don't try to take it all out in one pass, as it is important not to go beyond the lines. Obviously the general idea here is to carve the wood in the shape of a fish. However, there are also some design specifications that have to be maintained in order to attain the action that the lure is intended to have. One of these variables that affect the action is the shape.
I've done a lot of experimenting with lure shapes over the years and have found that sometimes even a small divergence from the intended design will change the action dramatically. So try and stick to the pattern and you should be just fine.
Once you've carved out the edges satisfactorily, it's time to taper the sides. The idea here is to carve a shape that gradually tapers back to a 3/16". Stand the lure on the tail side and from almost 1/2 way up the lure, make one pass with the knife removing wood diagonally. Make another pass starting from about 1/4 of the way up the lure. Your final cut should meet your top guideline. Repeat this process for the opposite side.
Now from the top and bottom view you can see how you've done. Have you taken equal amounts off both sides? The left and right side should be a mirror of one another. You can go ahead and carefully touch it up so they're smooth and even.
Now let's move on to the head of the lure. Again stand the lure on the end we're going to carve and hold securely. Remember to always carve away from your fingers, trust me this won't be much fun anymore if you hurt yourself.
Basically you want to bring the nose to a taper like you did with the tail only this time you'll begin from about 1/4 of the way up the side of the lure. Make a smooth taper towards the nose until the carve meets with the top guideline.
Your lure should look just like this:

Continue to remove edge tapering and narrowing the overall body. It is important to the balance of the lure that you remove equal weight on both sides so whatever you remove on one side try to mirror it on the other.
You should end up with a relatively smooth oval shape that gradually tapers from end to end leaving a flat circular surface on both ends for which to screw into later.
You should end up with a shape that looks like this:
Now it's time to sand your lure
Always sand in the direction the grain. You'll begin with coarse paper, around 100 grit and work your way to 400 grit paper until you have a very smooth surface.
Using the 100 grit paper, begin by smoothing any imperfections on the surface. This stage of the sanding also helps to shape the lure so make sure you have an oval shaped lure where the right half is a mirror the left.
Use a 200-grit paper to remove scratches and the 400-grit paper to give it a smooth as glass feel.
Attaching The Lip
You can use various plastics but I have found that the clearest and most durable is a product from Dupont called Lexan. This or other "plexiglass" products can be bought at any home improvement store at various thicknesses.
There are many types of epoxies on the market, most notably distinguished by their "setting" time, or hardening time. Most crafters utilize the 5-minute epoxy variety and rarely will a crafter work with a 30-minute brand. There are some 1-minute epoxies on the market, but that time frame for setting up leaves very little room to mix and apply a bubble-free layer of epoxy on a lure.
The defacto standard in epoxy for lure making is of the 5-minute variety. This is not to say that 5-minute epoxy cures in 5 minutes. It is to say, however, that 5-minute epoxy sets and takes a hard-fast shape in 5 minutes.
One of the disadvantages of standard 5-minute epoxies is the fact that they will turn yellow over time, especially if exposed to direct sunlight. Devcon-brand is noted for this.
Now comes the paint job
The key to any paint being used is adhesion. The paint has to bond to the surface. The wood should be primed or sealed before any paint is applied. Use an oil based sealer/primer.
There are two basic kinds of paints available on the market today, oil base and water base. Water-base paint or acrylic, as it's also known has the obvious convenience of ease of use and easy clean up. Normally, the drawback to acrylic and wood is it raises the grain of the wood due to it's water base. But as long as the wood is sealed (primed) there is no need to be concerned.
The second drawback is that it doesn't adhere to the primer as well as the second paint option, oil base paint. There are many different kinds of oil-base paints out on the market today so stick with an enamel that has a hi-solid content and dries quickly.
The main drawback of oil-base enamel is that clean-up is difficult. Everything has to be cleaned with a solvent like turpentine. If you have an airbrush you can work with that, if not rest assured that the greatest pieces of art were made with paint and a brush. A good Sable or Camelhair brush will should give you smooth even strokes.
Colors
For bass fishing, it's best to stick to basic colors. Crankbaits should match in a general way, the most dominant forage in the lake. Thus, popular crankbait colors that should be included in your tacklebox include: silver and black(shad), green and silver (Tennessee shad), chrome (open water baitfish), orange and brown(crawfish), etc. If golden shiners occur in your waters, "match the hatch" by using gold crankbaits.
Fluorescent colors are effective on crankbaits in many conditions. A popular combination is fluorescent green(chartreuse)/black spots/orange belly in stained water and/or cloudy days. Red works well around grass beds in clear and stained water. But always keep in mind that 80 percent of the strikes you get are due to your retrieve, not color. Choose the design for your lure such as "Perch", "Trout", "Shad" or any other popular finish or be creative and use your imagination, you never know what crazy color combo can land you that lunker. Paint your primary color using smooth even strokes trying to avoid any drips and runs.
After your first coat is dry, if your base coat looks a little translucent apply a second base coat. Next you can start adding your detailing colors, gills, lateral lines eyes and mouth are some of the details you may want to add to your crankbait to make it look very realistic. I prefer using plastic molded eyes but the painted eyes look just as good. If you allow the paint to dry too long after a prior coating just give it a light sanding with a 400 grit sandpaper. Also, give the lure a light sanding before applying a clear coat.
Protective clear coat
After your lure has been painted and you are satisfied with the look, then it's time to apply a protective, durable clear coat. There are many to choose from on the market today but the strongest and the most durable is the two-part clear epoxy kind. This is basically the same stuff that cars are painted with. Purchase a can of this stuff at your local hardware store or home improvement superstores and follow the directions. You can apply 2 or more coats of this for a glass like finish on your creation.
IMPORTANT
Tuning crankbaits
Crankbaits (especially homemade ones) have to be "tuned" so that they run true. Start by always using a loop knot or split ring to tie your lure on. This is to allow the lure the action it was intended to have. Now check how it's swimming. You can do this in a full tub if needed. Most discrepancies in the placement of the "lip" and "eye-screws" can be compensated to make your crankbait run true. With needle-nose pliers bend the "line" eye in small increments, in the opposite direction the lure favors. If it runs left bend slightly right etc.. Sometimes fisherman will intentionally mistune a crankbait to get to swim in a certain direction, such as along a weedline or log.
Now you're ready to fish with something you've made yourself that you can take pride in when you LAND THAT LUNKER!


