| Sidebar |
|
Long the bait of choice for serious bass anglers, crankbaits have been used for as many years as mankind has been fishing. First experimenters carved pieces of wood in various shapes and sizes, adding hardware - and in very old baits, as many as six hooks (later considered extreme). Never believing a better "mousetrap" could not be invented, humans continued to produce, reproduce, reshape and add new colors to the vast rainbow array of crankbaits on the market today. Tinkering with crankbaits, whether changing out hooks or painting them, tuning them for the angle of run, etc. is not something anglers should consider a sideline hobby. Making a lure look "different" from what fish are seeing (currently popular models and colors that everyone is using) can make the difference between a decent day of fishing and an exciting one. |
Crankbaits are, by nature, lures that, to a degree, fish themselves. It seems reasonable that there can't be much to fishing these plugs since all you have to do is throw and crank them into the boat. If you learn to use these versatile plugs, there is much more to it than it appears, including keeping them in optimum condition for fishing. Most of today's cranks are rather reliable as purchased off the shelf. They run straight and perform at the depth for which they are rated.
To fully appreciate the meaning of having quality control in modern-day crankbaits, you must realize their heritage.
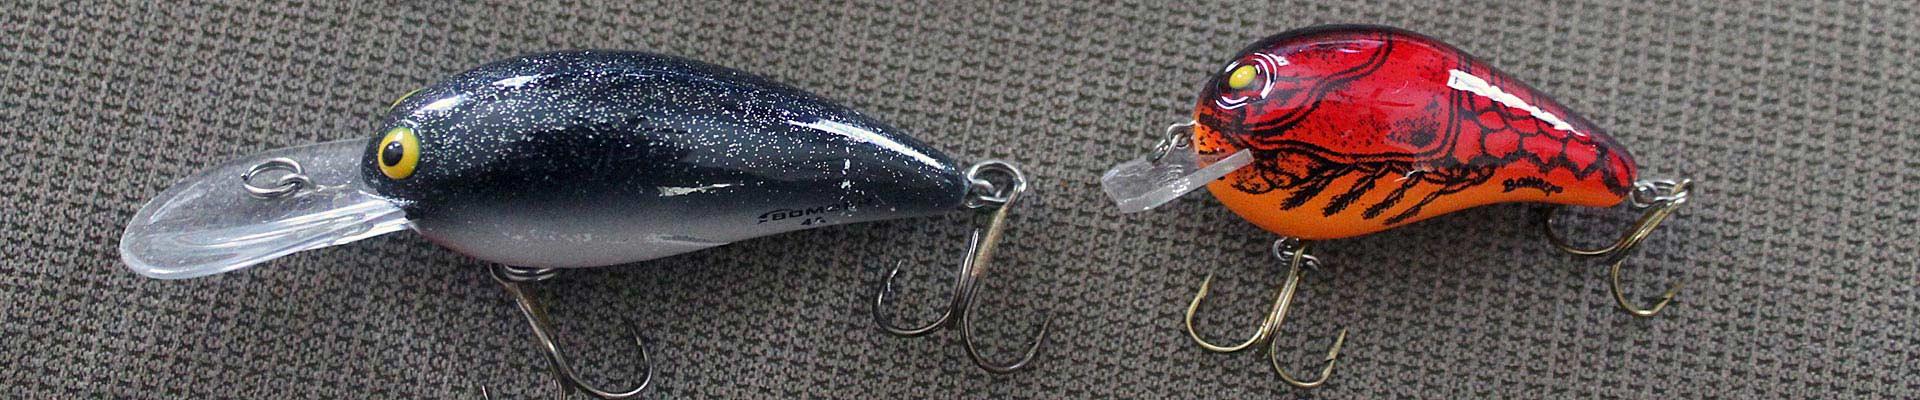
The lipless style of cranks, such as Hot Spot and Sonic, have always been fairly reliable in their tracking patterns. But earlier deeper-diving cranks, such as Hellbenders and Bombers, required a certain ongoing realignment if they were to run true on the retrieve.
The line attachment consisted of a wire loop that would tend to bend from either the pressure exerted by a thrashing fish or often when a violent contact occurred, such as with an underwater brush or structure during the retrieve. The line attachment of these plugs and our present-day lures must align with the plug's mid-line if they are to track straight. The other factor which causes the plugs to track to one side or the other on the retrieve is for any eye, particularly the one attaching the front hook to the lure, to get bent to the side.
You can get a crankbait to go deeper if you can change its dive angle. In the case of the older metal-lipped crankbaits, this could be done by carefully bending the front edge of the plug with a pair of needle nose pliers. The bend couldn't be too extreme, or you got too much wobble and little in the way of extra depth on the dive.
It takes a real effort to get this the same on a bait with clip, but the Luhr-Jenson folks tried to use this concept in their earlier Hot lips series. The instructions included heating the lip at an etched line and bending the front of the lip up to catch more water, thus causing a steeper dive angle. They have since offered a longer-lipped version without the option for bending the lip. The problem was the same as with the metal lips in that the exact angle of the bend could work as billed or, if exaggerated, ruin the action. The Mann's Deep 20 and 30 models have this physical concept built into the lip as a small curl around the front edge.
We may not always appreciate the importance of the reliability of today's versions of crankbaits, but there was an era when many brands that didn't run true were on the market. In my opinion, the real mushrooming of the number of crankbaits can be attributed to one phase in the evolution of bass fishing. That occurred when Cordell introduced the Little O, and Norman, hot on his heels, introduced a thinner version - the little N. These plugs ran straight on the retrieve, were easy to cast, and thus anyone could catch some fish on them. During the same time frame, many imitations came forward, and most of the "Little Whatevers" bit the dust simply because of their lack of ability to perform when taken straight out of the box. This was only a slight problem for those of us who had been adjusting Bombers and Hellbenders for years, but the public wasn't interested in learning how to tune a bait by forcing the lip eye to the far right or left on each one they bought.
Another problem with some of the plastic plugs on the market at that time was a little seepage, which now wipes out the action by destroying the balance. I won the warmth award from one lure manufacturer by suggesting during a fishing show he markets four to a package. One would run to the left, one to the right, one would sink, and the final one would run straight.
If for some reason, one of your favorite plugs does get a leak and you can't replace it (for some reason), then there are options for making repairs. If you can find the leak, it is relatively simple to shake the water out of the plug and epoxy the hole. When the site of the leak is not evident, you may have to drill a small drain hole, epoxy the hole after getting the water out, and then spray the plug with a clear sealer.
Even with the reliability of today's products for running correctly - right out of the box- you will occasionally have to tune the plugs. The best way is to look at the plug from the front and see if the lip eye is straight. If it is, check the position of the eyes holding the hooks. The front and back eyes should be lined up along the mid-line of the lure's body, or the balance will be altered.
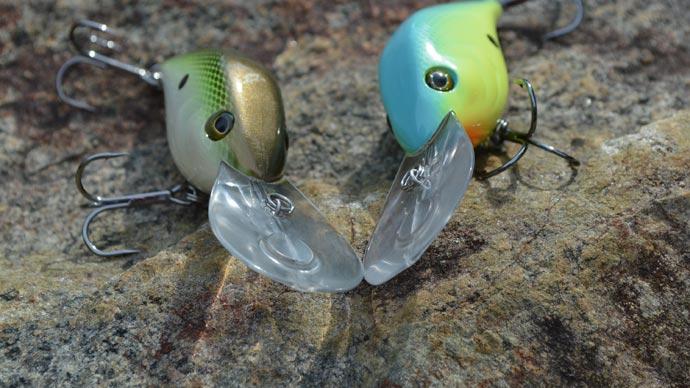
Another type of crankbait with unique areas of concern is a jerkbait which has a lip glued into the body. If the lip shifts ever so slightly, the actual stability of the bait on the retrieve is altered. I have spent several minutes checking my eyes only to realize that the lip has a slight play to one side. Remove the lip and re-glue it in place. There is no pressure on the lip when fighting a fish, so it only controls the action and the tracking on the retrieve. If there is any looseness, or apparent movement, of a lip in which an eye is located, then chunk the lure. The other option is to lose a good fish when it finally gives way. A couple of companies are no longer in favor because folks don't take too kindly to pulling in an O-ring or a lip when they catch a large fish or hang up their plugs.
You need to perform some checks on crankbaits - preferably before you go to the lake. Of utmost importance is to see if your O-rings show signs of wear. You should use a good quality stainless steel O-ring equivalent to what most companies use as original equipment. While these are tough, they do wear out. If they seem to spring apart easily when you stick your fingernail between the layers, then chunk them. If you use crankbaits, a good pair of O-ring pliers is necessary for quick replacement and minimizing the risk of sticking a hook in your hand.
The other check-up you need to do before heading to the lake is to see if any of your treble hooks have bent or broken tips. Either of these flaws provides a guarantee that you are going to lose fish. You have a couple of options for replacements of treble hooks. First, there are some extra sharp hooks available. However, you might want to see which ones have the longest functional life, particularly if you fish in heavy brush. A sharp hook that loses its point the first time you hang up will drive you up the wall since you will spend an appreciable time replacing them.
Sometimes you have to replace hooks and O-rings on the water, but this is preferably an off-the-lake operation since any on-the-water repairs cost you valuable casting time. One thing that doesn't cost you much fishing time is to use a good hook sharpener whenever the tips are dull.
Another area of crankbait modification is styling your colors. I may not be a genius, but as a kid, I figured out pretty soon that all of the minnows and shad that folks were getting out of the minnow series came in variations of silver. So when I went from the live bait phase to throwing crankbaits, I figured these should be represented by chrome or silver versions. A couple of my fishing buddies in Houston bought into the concept (if it works, you can easily convince folks with an open mind). The result of this cult was that our bass club would likely have one or more boats with a couple of newly painted Hellbenders dangling over the edge and awaiting their turn in line as soon as they got dry. I always carry one of each of my favorite crankbaits painted with a chrome-aluminum finish. Money back guarantee is that in relatively clear water and when bass are feeding on shad, this color will produce big time.
Another casualty of developing the more commercially complex lure colors was dropping those painted in either solid white or bone. Early on, folks on Rayburn and Toledo Bend noticed that the Little N's often got even more effective as the coat coloring wore off, exposing the bone color of the plastic. Many a Little N or Deep Little N was purchased only to have the original color scrapped off before it was thrown. You can't find a bone color in most lure lines. However, you can buy that exact color in exterior spray paint and make your own. Either white or bone is a killer in low light conditions such as the early morning or stained water.
The paint options are now much superior to when I first started spraying anything that didn't move with aluminum color. Most exterior paints by companies such as Krylon are tough and dry in minutes. Any discount or hardware store will also have a wide variety of very bright colors in shades of orange, yellow, and red.
If you have read my articles over time, you have heard me mention Floyd Mabry. Mr. Mabry is in the Freshwater Fishing Hall of Fame in Athens. From my standpoint, he is the father of crankbait fishing. For years he worked with Bomber Baits and developed many of their basic colors. As with many changes in the fishing industry, the Gainesville company was purchased. With that acquisition, two of my favorite colors that Mr. Mabry helped develop were either offered in limited types of lures or dropped. This presented a significant family crisis for my father and me. Subsequently, I was able to get a couple of lure manufactures to paint the shad color, but until that occurred, I had to work out an emergency strategy.
One of my friends, who had also gotten a religious zeal for the color, bought an airbrush sprayer to copy the colors. Painting the body of a plug solid white, allowing the white to dry, and then passing a burst of chrome spray over the top half of the plug could make the general color. The final touch was a pale pink tone along the side. The needed part was trying to figure out how to add scales. This became the most straightforward part once I hit on the answer. Once the white dries, obtain some fiberglass mesh joint and patch tape from any hardware store and cut the tape to the desired pattern for the area of the scales. The tape sticks to the dried white surface, and the over-spray of your desired color gives a professional design in the form of a scaled pattern.
You don't mess with paint at any stage until it is completely dry, and you also need to work with paint in a well-ventilated area. You can get as creative in color designs and combinations as you desire, but you must always start with a solid white base to get the most vivid colors from the other contrasting colors you want to add. You also need to remember in painting lures, as with painting most things, it's best to use several thin coats rather than trying to add a thick finish at one sitting.
It's fun to bring back old colors, such as parrot. This color is a base bone with a florescent yellow-green on top and an orange throat patch on the bottom. A friend from south Texas was fishing an off-colored lake and wasn't happy with his crankbait results. He had never heard of this color combination, but those of us who fished Livingston when it was new swore by it. So I sent him a plug I had painted in a parrot color and got a call that, while polite, had somewhat skeptical overtones. The following week I got another call advising me he had won a tournament with the plug, and his wife implied the whole tackle box looked like a giant parrot.
If you let the finish dry for at least a day on any color combinations, you can add a bit of extra surface protection by spraying a thin coat of clear high-gloss polyurethane. In most cases, it is only needed if you want a gloss. When you decide to bring back older, roughed-up lures by painting them, you probably are going to have to sand them or use a paint remover to get rid of the old color, which will leave you with a smooth surface on which you will get the best finish with the new paint job. The other thing about painting your plugs is that you can buy plugs when on sale or close-out because you don't care if the color won't catch fish - you are going to paint it the new color of your choice.
We have discussed several things that you have to do in the proper care of crankbaits, but others, such as designing your favorite colors, let you be creative in making your patterns. Of course, it's fun to realize you can create these unique color combinations, but some interesting side effects occur when you pull such a color from your tackle box, and your fishing buddy first sees it.